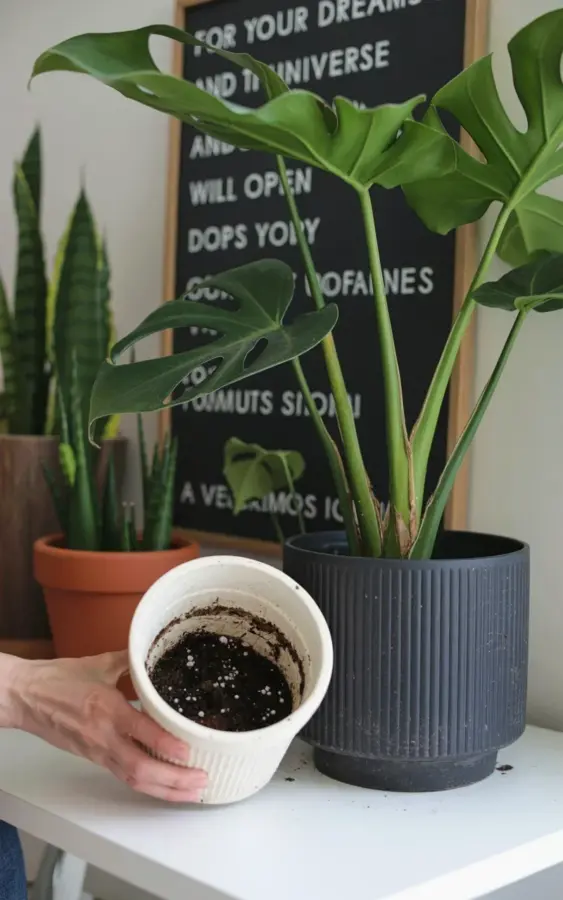
Repotting Monstera is hands down one of the most exciting days for an indoor gardener. There you are, admiring those massive, fenestrated leaves, maybe holding a brand new ceramic pot that looks absolutely stunning. Then the hand in the photo, my hand actually, is hovering over that white ceramic pot with visible drainage holes, ready to make a choice. Let me tell you, the choice I almost made was a costly one, and I am so glad I snapped this photo as a reminder before I messed up my favorite plant.
Drainage holes are the absolute backbone of healthy Monstera care. If you are mid-repotting right now, looking at a pretty pot with no holes in the bottom, please put it down. Look, that black ribbed planter in the photo is gorgeous, but it is just the outer cover, a cachepot. The white pot inside is the actual home, and it has holes for a reason. Root rot is a silent killer, and it starts the second you trap water against those thick, vulnerable roots.
Why Drainage Holes Are Non-Negotiable for Monstera Deliciosa
Monstera roots are thick, almost like aerial roots, and they absolutely hate sitting in soggy soil. When you water your plant, the water needs a clear exit path. If it just pools at the bottom of a sealed container, you are creating a swamp. A swamp that breeds bacteria, fungus, and eventually root rot.
I learned this the hard way with a smaller plant years ago. I thought I was being clever by layering pebbles at the bottom of a pot without holes. Spoiler alert: the pebbles did nothing. The water table simply rose right back up into the soil because there was nowhere for it to go. It was a mess.
In the photo, you can see the black ribbed planter is just a shell. It is there for aesthetics, to hold the white pot and catch any drips. The white pot is what is doing the heavy lifting. Keep roots healthy and avoid root rot, that is the entire game. If you love that solid pot, use it as a sleeve, never as the main planter.
How to Choose a Planter for Your Monstera (That Isn’t a Death Trap)
When you are shopping for new digs for your plant, you have a few solid options. The best setup is a nursery pot with drainage holes that fits snugly inside a decorative outer pot. This gives you the best of both worlds: style and function.
You want to look for a pot that is roughly 2 inches larger in diameter than the current root ball. Too big, and the soil stays wet for too long. Too small, and the roots get cramped and strangled.
Here is a quick checklist for your next plant day:
– Check the bottom for holes before you even admire the glaze
– When in doubt, buy a basic plastic nursery pot and a pretty cover pot
– Terracotta is amazing because it wicks away extra moisture
– Make sure the outer pot has enough room for air to circulate around the inner pot
The Common Mistake of Layering Gravel at the Bottom of a Pot
I mentioned this earlier, but it is worth repeating because it is such a popular myth. So many people, including my past self, think that adding a layer of gravel or pebbles under the soil creates drainage. It creates something called a perched water table. Honestly, it took me way too long to understand this concept.
The water doesnt hit the gravel and stop. It wicks through the soil until it hits the gravel layer, and then it sits right there at the boundary. Your plant roots are sitting in that saturated zone, soaking in moisture 24/7. That is a recipe for disaster.
If your pot does not have holes, the only safe fix is to treat it as a decorative cover. Get yourself a cheap plastic pot with holes, slip it inside, and pretend the outer pot is just a pretty jacket. This works for almost any planter, as long as the water doesn’t pool at the bottom of the jacket and touch the inner pot.
Repotting Plants the Right Way: A Step-by-Step Guide
Ok so, let’s walk through the actual process of repotting plants successfully. First, water your Monstera a day or two before you plan to repot. Hydrated roots are pliable and less likely to snap during the transition.
Slide the plant out of its current pot. Don’t yank it. Squeeze the sides of the pot, tip it sideways, and gently coax the root ball out. If it’s stubborn, run a knife around the inside edge. You want to be firm but gentle.
Now, place a piece of mesh or a broken shard of terracotta over the drainage hole. This prevents soil from washing out while still letting water escape. Add a layer of fresh, chunky aroid mix to the bottom. Pop the plant in, fill around the sides, and tap the pot to settle the soil. Give it a good drink, and let it drain completely before putting it back in the cover pot.
How to Avoid Root Rot When Repotting Monstera
Root rot is identified by the smell, honestly. If your soil smells sour or like rotten eggs, you are in trouble. Healthy soil should smell earthy and rich, not like a sewer.
After you repot, avoid the urge to water on a strict schedule. Stick your finger an inch or two into the soil. If it feels bone dry, water it. If it feels cool or damp, wait. Monstera prefers to dry out between waterings, especially the lower half of the pot.
If you notice roots that are brown, mushy, and slimy while repotting, you need to act fast. Cut them off with sterilized scissors immediately. No mercy. Those dead roots will spread the rot to the healthy ones if you leave them. Then, treat the healthy roots with a diluted hydrogen peroxide rinse to kill any lingering bacteria before you replant.
Why a Cachepot (Like That Black Ribbed Planter) Is Only for Show
The black ribbed planter in the photo is a perfect example of a cachepot. It has no drainage holes, and it is completely sealed. It is meant to hide the functional pot and catch excess water. That is its only job.
Using a cachepot correctly means you have to be disciplined about emptying the water after you water your plant. Never leave your Monstera sitting in a puddle of water inside the outer pot. That is just recreating the problem of poor drainage all over again.
You also want to make sure the inner pot isn’t sitting flush against the bottom of the cachepot, trapped in leftover water. If I use a pot like the one in the photo, I always tip it over the sink after watering to make sure there is zero standing water. It takes ten seconds and saves me a ton of anxiety.
Repotting Plants for Beginners: The Simple Outdoor Planter Trick
If you are new to this, here is a simple mental shift: think of every pot as a pair of shoes. The pretty black boots are for the sidewalk, but you wouldn’t wear them in the shower. Similarly, the decorative planter is for living room display, but the white pot with holes is for growing.
I genuinely love the look of a matching outer pot. It elevates the houseplant game. But my favorite technique is to double pot everything. It makes soil changes easier, it makes watering easier, and it means I can switch up the display pot whenever I redecorate without disturbing the plant.
The decorative sign in the background of the photo reads “For Your”, which feels oddly fitting. It reminds me that this advice is for your green thumb, for your plant’s health, for your sanity. Repotting doesn’t have to be scary. Just look for the holes, use a cover pot if you must, and give your Monstera the drainage it desperately needs.
One last tangent, the terracotta pot in the background of the photo is my backup plan. It is unglazed, which means it breathes. That airflow to the roots is magical for preventing overwatering. If you are a chronic overwaterer, ditch the glossy ceramic and go for plain terracotta.
So, when you tackle your next repotting project, remember that drainage holes are your friend. They are the difference between a thriving, jungle-sized Monstera and a sad, droopy mess. I hope this saves you the same headache I put myself through years ago. Go grab your plant, check that pot, and give those roots the home they actually deserve. If you have a specific pot you’re unsure about, snap a photo and share it, I love helping people troubleshoot their setups.
Leave a Comment