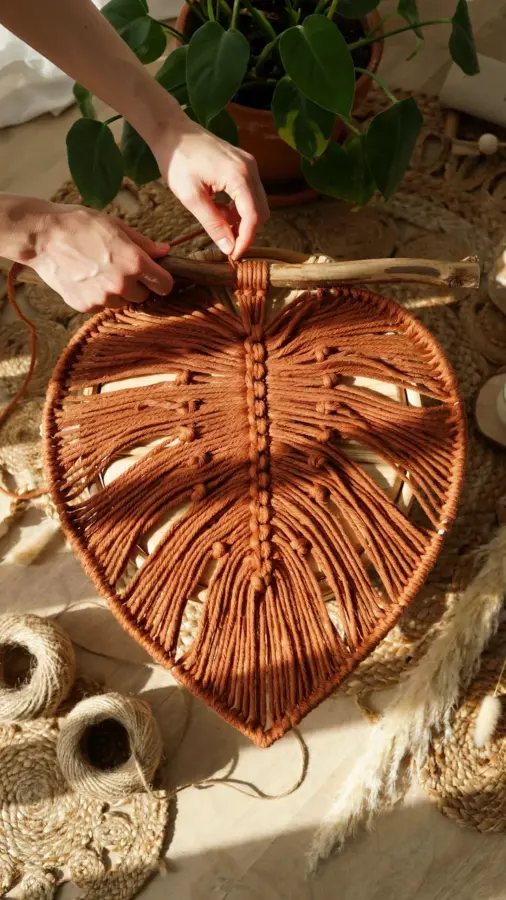
I first stumbled on the macrame leaf wall hanging while browsing a tiny boho shop in Portland, Oregon. It was October, and the store had a basket of dried orange slices and cinnamon sticks near the register. Honestly, the leaf hanging caught my eye because it looked like a preserved autumn leaf, but made of soft cotton rope. I bought one on impulse, and now here I am, making my own versions for every corner of my apartment. That simple piece of fiber art changed how I think about wall decor.
Why I Chose a Macrame Leaf Over Other Wall Decor
Look, I’ve tried printed posters, metal sculptures, even a gallery wall of mismatched frames. None of them gave my space that warm, organic feel I wanted. A macrame leaf wall hanging is different. It adds texture without shouting for attention. It’s like a whisper of nature indoors. Not gonna lie, I also love that it costs almost nothing to make compared to store-bought art.
Here’s the thing: most wall decor is flat. Rectangles on rectangles. A leaf shape breaks that pattern. It curves, it drapes, it catches light differently from morning to evening. One friend said it looked like my wall took a breath. Ok so that sounds a little hippie-dippie, but I swear it’s true. The leaf literally moves when a window is open. Small details matter.
Best Macrame Cord for a Leaf Wall Hanging That Looks Natural
I tried three different cords before I found my favorite. First was a cheap acrylic rope from a big craft store. It felt plasticky, and the leaf wouldn’t hold its shape. Second was a recycled cotton blend – better, but it frayed too much. Finally I used a 3mm single-strand twisted cotton rope. That was the winner. It’s soft enough to knot easily but stiff enough to keep the leaf veins defined.
What about color? I went with undyed natural beige for that earthy autumn vibe. But you could also use a warm rust tone or even a pale sage green. One weird detail: I accidentally bought a spool that smelled faintly of jute, like a burlap sack. That odor faded after a day, but it made me wonder if different processing methods affect the feel. Anyway, stick with 100% cotton and you’ll be fine.
- Material: 100% cotton twisted rope (3mm thickness is ideal)
- Amount: about 20 yards for a medium leaf (10-12 inches tall)
- Where to buy: local yarn store or online – avoid the ultra-cheap stuff from dollar bins
- Extra: a wooden dowel or driftwood piece for hanging (optional, but looks nicer than a nail)
My Step by Step Method (That Actually Worked)
I am not a patient person. I tried following a video tutorial from a popular macrame page, but the instructor talked for ten minutes before showing a single knot. I almost gave up. So I developed my own shortcut approach. Here’s what worked for me.
Start with a central cord that acts as the leaf stem, about 12 inches long. Fold it in half and attach it to your hanging ring or dowel with a larks head knot. Then add ten more cords of varying lengths – six at 20 inches, four at 16 inches – all with larks head knots. This gives the leaf its tapered shape. Then you tie alternating square knots down the middle. The rows get shorter as you go. After four rows, switch to diagonal clove hitch knots to create the leaf vein lines.
And here’s where I messed up the first time: I kept the tension too tight. The leaf curled up like a dried basil leaf. Not cute. You want the cord to sit snug but not strained. Let it drape a little. Seriously, if your leaf looks wonky after the first attempt, just undo the last row and try again. It takes five minutes to redo, and the result is way better.
For the bottom tip, I gathered all the remaining cord tails and tied a simple overhand knot. Then I trimmed the ends diagonally so they fray just a little. Some people bead the ends – I didn’t, because I wanted a raw natural look. But you could add wooden beads if you’re braver than me.
Where to Hang Your Leaf for Maximum Coziness
Not gonna lie, I put my first leaf in the hallway and it just disappeared against the white wall. Too much empty space around it made it look lonely. So I moved it to a reading nook corner, right next to a floor lamp with a warm bulb. That changed everything. The shadows from the leaf against the wall created a second leaf shape. Double the effect for zero extra work.
Another spot that works: above a low console table or a vanity. Leaves look especially good when they hang at eye level or slightly below. If you have a plain curtain rod, you can even clip a small leaf to it as an accent. One friend hung hers inside a clear glass window frame – that looked like a botanical specimen. Weird but cool.
Avoid hanging near a radiator or direct sunlight for long periods. The cotton can dry out and get brittle, and the color may fade if it’s dyed. My natural beige leaf has held up fine, but a friend’s dark moss green one turned yellow after three months near a west-facing window.
Styling Tips: Pairing Your Leaf With Other Boho Elements
Macrame leaf wall hanging works beautifully on its own, but if you want a full boho corner, don’t overdo it. Too many macrame pieces on the same wall and suddenly it looks like a craft fair exploded. I keep it simple: one leaf, one woven wall basket, and a small potted pothos plant on a shelf below. That’s it. The contrast of the soft rope, the hard basket weave, and the living green leaves creates a balanced composition.
What about color palettes? I’m a fan of warm neutrals: cream, tan, terracotta, dusty rose. A leaf in natural beige fits right in. If your room leans cooler, like grays and blues, you could dye your own cord with a weak tea bath. Seriously, soak the rope in cold black tea for an hour, rinse, dry – it gives a subtle antique tint that AI-generated images never capture properly.
Also, don’t be afraid to hang two leaves at different heights. One large, one small, like a mother-and-child leaf pair. I did that in my bedroom above the bed, with the larger leaf centered and the smaller one tilted slightly to the left. It feels more organic than perfect symmetry. Imperfection is the whole point of handmade decor, right?
A Small Mistake That Changed My Design
I was halfway through a leaf for my sister’s birthday gift. I had the shape almost done, felt proud, stood back to admire it. And then I realized I had accidentally used a left diagonal clove hitch where a right one should go. The veins on one side were tighter, making the leaf curl asymmetrically. My first instinct was to rip it all out and start fresh. But I stopped. I looked at it again. That slight asymmetry actually looked better. More like a real leaf, which is never perfectly symmetrical. So I left it.
Now I intentionally build small imperfections into every leaf I make. A slightly longer left side. A knot that’s a tad looser on one vein. It makes each piece unique. Plus, it saves me from obsessing over perfection. My cat Willow once batted at a hanging leaf while I was working, unraveling three knots. Instead of fixing them, I tied the loose ends into tiny decorative tassels. Mistake turned into feature. Honestly, that leaf with the cat-added tassels is my favorite one.
Final Thoughts
Making a macrame leaf wall hanging is one of those projects that feels both simple and satisfying. You don’t need expensive tools or years of craft experience. Just some cord, a few basic knots, and a willingness to let go of perfect symmetry. The result is a piece of decor that brings warmth to a boring corner and reminds you of autumn leaves, even in the middle of spring. I’ve made seven leaves so far, for friends, family, and my own walls. Each one is a little different, and I love that.
If you try making one, I’d really like to see it. Drop a comment below with a photo link or tag me on Pinterest @yourhandle – I’m always curious what shapes and colors people choose. Happy knotting.
#macrame #macrameleaf #diyhomedecor #walldecor #bohodecor
Leave a Comment