Why Citrus Patterns Are Trending Right Now
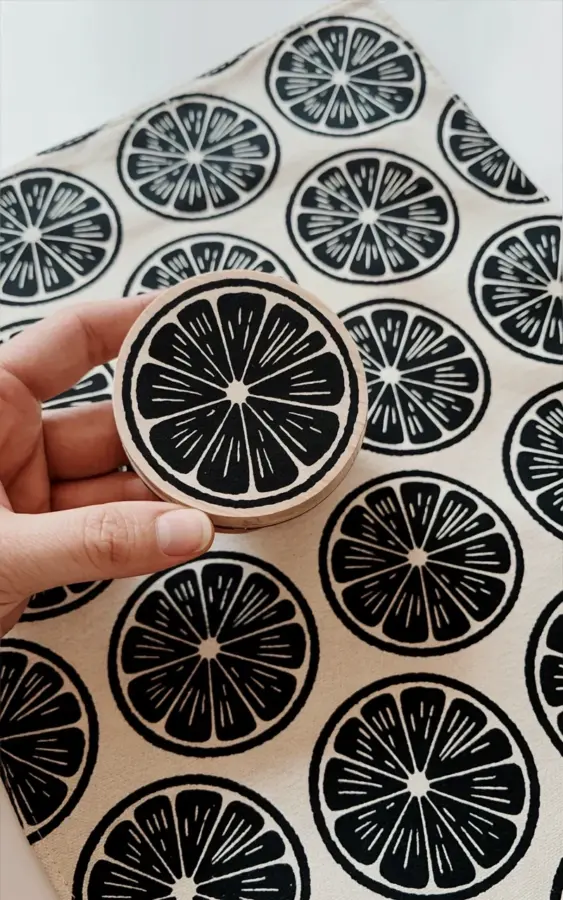
If you have scrolled through home decor or craft blogs lately, you have probably noticed a fresh wave of citrus prints showing up on everything from tea towels to throw pillows. There is something cheerful and clean about a black and white lemon pattern that works for any season, but especially for spring and summer. The photo that inspired this post shows a simple repeat of circular lemon slices on a light beige background, with a hand holding the very stamp block used to make it. That kind of hands on, budget friendly project is exactly what I want to share today. This DIY lemon fabric stamping on a budget is a perfect way to join the trend without spending a lot on fabric or tools.
I first tried fabric stamping a few years ago because I wanted custom prints but could not justify the cost of screen printing or buying designer fabric. Citrus motifs are especially forgiving because the organic shape of a slice hides small mistakes. You can make a whole yard of pattern in an afternoon and end up with something that looks intentional and artful. The black and white palette keeps it modern and easy to match with other prints.
Budget Fabric Stamping Supplies You Already Have
One of the best parts about this project is that you probably own most of the supplies already. For the black and white lemon print shown in the photo, you need just a few items. Here is what I used:
- A plain wooden block or a rubber stamp mount (I found a round block at a craft store for under two dollars)
- Black fabric ink or acrylic paint mixed with textile medium (sold at most craft shops for about five dollars)
- A light beige or cream fabric piece, like a cotton pillow cover or canvas tote bag
- A pencil and ruler for marking grid lines (optional but really helpful for alignment)
- A sharp carving tool if you are cutting your own stamp from a soft block or eraser
If you do not want to carve your own stamp, you can buy a pre made lemon slice stamp online. But carving your own gives you control over the line detail and saves money. The stamp in the photo has intricate lines showing the segments and pulp structure, which is surprisingly easy to carve with a little practice.
How to Make a Lemon Stamp Block for Fabric
Start by drawing a circle the size you want your lemon slice to be. I used a bottle cap as a guide for a three inch diameter. Then sketch the segments radiating from the center, like a sunburst. Keep the lines slightly curved to mimic the real fruit structure. Once you are happy with the design, transfer it to a soft carving block using a pencil or by tracing.
Carve away the areas you do not want to print. The lines you leave behind will hold the ink. For the black and white look, you want bold lines and open spaces. Take your time with the carving tool, working in small strokes. I recommend practicing on a scrap piece of rubber first if you have never carved before. After carving, test the stamp on paper to see if any lines need cleaning up. The final stamp should feel crisp and detailed, just like the one in the photo.
If carving sounds too fussy, another option is to use a laser cut wooden stamp from an online shop. They are often under ten dollars and give you that precise line work right away. Either way, the result will be a reusable stamp block that you can use for many projects.
Stamping a Grid Pattern on Fabric Step by Step
Fabric stamping works best when you have a clean, flat surface. Iron your fabric first to remove wrinkles. Then use a ruler and a water soluble fabric pen or chalk to draw a faint grid. The grid in the photo is spaced evenly, about four inches apart between centers of the slices. This allows for a little breathing room around each print.
Apply a thin, even layer of black ink onto a foam plate or ink pad. Press your stamp block into the ink, making sure every carved line is coated. Do not overload it or the details will blur. Place the stamp firmly onto the fabric, press down with even pressure for a few seconds, then lift straight up. Repeat across the grid, aligning each new print with your marks. Wipe the stamp clean between prints if ink builds up in the grooves.
I like to stamp every other row first, then come back to fill the gaps. This way the wet ink does not smear if my hand brushes against a neighboring print. Let the stamped fabric dry completely for at least 24 hours, then heat set it with a dry iron on the reverse side to make the design washable.
DIY Lemon Print Tote Bag and Pillow Cover Ideas
The natural home for this citrus pattern is a simple tote bag or a pillow cover. For a tote bag, stamp the design on the front panel only, leaving the sides and bottom plain. Use a canvas tote from a dollar store or repurpose an old one you already own. The black ink on beige canvas looks effortlessly chic and works as a grocery bag or a beach accessory.
For pillow covers, buy a plain cotton or linen cover in cream or light natural. Stamp the lemon pattern all over the front, or create a smaller grid in one corner for a subtle accent. I have also seen people stamp just three slices in a triangle arrangement near the zipper, which gives a modern minimalist vibe. Either way, the project costs a fraction of what you would pay for a designer pillow.
Other ideas include stamping on a kitchen apron, a set of cloth napkins, or even a plain white t shirt. The black and white theme makes it easy to mix with other patterns like stripes or polka dots. Just be sure to use fabric specific ink so the print lasts through washing.
Caring for Your Hand Stamped Fabric
After you finish the project, you want the lemon print to stay crisp for as long as possible. Hand stamped fabric needs a little extra care. Wash it inside out in cold water with a mild detergent, and avoid bleach or harsh stain removers. Do not soak the fabric for long periods. Tumble dry on low or hang dry to prevent the ink from fading.
If you used acrylic paint mixed with textile medium, heat setting is essential. Place a thin cloth over the stamped area and press with a hot iron for three to five minutes. This bonds the paint to the fibers and makes it resistant to washing. For ink pads that are labeled permanent, the heat setting step is still recommended for extra durability. With proper care, your citrus prints will look great season after season.
I have had a stamped pillow cover for two years now, washing it every few weeks, and the black lines are still sharp. That is the beauty of taking a few extra minutes during the heat setting process. It makes the project feel professional and long lasting.
If you love this look, save the idea for your next craft afternoon. Pin the photo from this post so you can find the steps easily later. I would love to see your own lemon printed projects, so feel free to share them in the comments or tag me on social media. Happy stamping!
#diystamping #fabricstamping #citruspattern #lemonprint #budgetcrafts
Leave a Comment