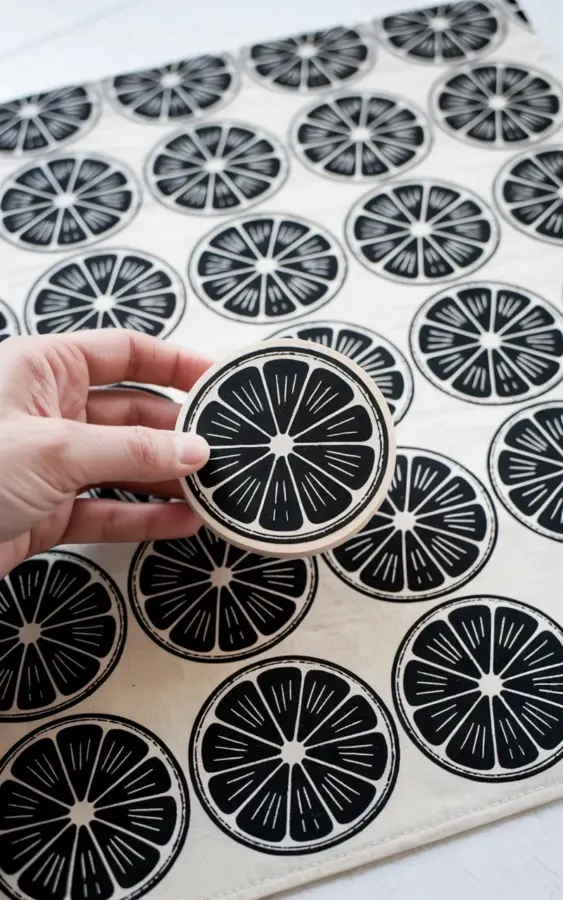
The first time you see it done, blockprinting looks deceptively simple. You press a carved block onto an ink pad, stamp it on fabric, and repeat until the pattern covers your table. Then you try it at home and your lemon slices come out smudged, patchy, or crooked, and you wonder where it all went wrong. I’ve been there. I ruined a perfectly good yard of natural linen before I figured out the rhythm of it. Blockprinting citrus slices on natural linen is honestly one of the most forgiving projects you can try, but there are a few classic mistakes that will trip you up. Let’s talk about how to avoid them so your lemon pattern looks as crisp and intentional as the one in the photo.
The image that inspired this whole post shows exactly what you’re aiming for. A hand holding a circular stamp block hovers over a grid of perfect lemon slices, each one stamped in black ink with every tiny segment and pulp line visible against a light beige linen background. That level of detail is achievable. You just need to know what not to do. Here’s the thing, most craft blogs will tell you the basics and then leave you to figure out the rest on your own. I’m going to walk you through the five biggest mistakes I see people make (and yes, I made all of them so you don’t have to).
Mistake #1: Over-Inking Your Lemon Stamp
This is the most common error by a mile. People press their stamp into the ink pad too hard or they roll it on too many times, and then they get a blob instead of a beautiful lemon pattern. The ink fills in all those delicate grooves that create the citrus slices design, and suddenly your stamp looks like a solid black circle instead of a detailed fruit.
Here’s what works: press the stamp onto your ink pad lightly, just once or twice. You don’t need to grind it in. Look, the stamp should grab ink on the raised surfaces, not the recessed lines. If you can see ink pooling in the carved areas, you have too much. Do a test stamp on a scrap piece of paper first. If the print looks muddy, let the ink dry on the paper, then stamp once more on the same spot without adding ink. That little second press usually clears off the excess.
One thing that surprised me? The ink pad matters just as much as the pressure. A fresh, juicy pad will dump color onto any stamp that touches it. An older, slightly dry pad gives you much better control for this kind of detailed lemon pattern. I actually keep a dedicated pad for my finer blocks. When I started blockprinting, I never would have imagined that I’d prefer a tired pad, but here we are.
Mistake #2: Pressing Unevenly and Getting Patchy Prints
If your stamped lemon slices look great on one side and barely visible on the other, you’re not applying even pressure. This one drove me crazy for weeks. I would press the center of the block, think I was done, and then peel it up to find a half-moon lemon staring back at me.
The fix is boringly simple. Use both hands. Place one palm flat on the back of the stamp and press down firmly, then shift your weight gently from one side to the other without sliding the block. Hold for a full three seconds. I know that sounds like an eternity mid-project. You’ll feel impatient. Do it anyway.
For bigger stamps, like one that holds a full citrus slice pattern, you might need to apply pressure in phases. Press the center first, then rock slightly to hit each edge. When you pull the block away, lift straight up. No peeling from one corner, because that dragging motion is what causes the edges of your lemon slices to look smeared or doubled.
Mistake #3: Not Planning Your Grid Layout Before You Start
The photo above shows a perfectly aligned grid of lemon slices, and trust me, that does not happen by accident. I skipped the planning stage on my first attempt and ended up with a table runner that looked drunk. Some citrus slices were half off the edge, others were overlapping, and the spacing was all over the place.
Take a measuring tape and a fabric pencil and mark out your grid first. Decide whether you want the lemon slices spaced close together or with room to breathe. For a natural linen napkin, I like to leave about an inch and a half between each citrus slice. For a runner, you can cluster them a bit tighter. The point is to know exactly where every stamp is going to land before you dip it in ink.
Another thing that helps? Mark the center point of your stamp block. Put a tiny notch on the edge or draw a small cross on the back. That gives you a visual reference for aligning the stamp to your grid marks. It sounds like a tiny detail, but it makes a huge difference when you’re working down a long row of fabric.
- Map out your entire grid on the fabric with a washable marker or chalk pencil
- Stamp a test row on scrap linen to check spacing and ink levels
- Mark the center of your stamp block so you can align it accurately to each grid point
- Work from the center of your fabric outward to keep the pattern balanced
- Keep a damp paper towel nearby to wipe the stamp between prints
Mistake #4: Choosing the Wrong Materials and Fighting the Fabric
There’s a reason the photo in this post shows natural linen and not a slick cotton broadcloth. The texture of linen grabs the ink and gives the finished print that rustic boho feel. But linen can be a nightmare if you don’t prepare it correctly. If you try to stamp directly on fabric that has wrinkles or has been washed with fabric softener, the ink will skip and your lemon pattern will look broken.
Press your linen first. I mean really press it, not just a quick once-over. Wrinkles are the enemy of crisp blockprinting. And do not, under any circumstances, use fabric softener on your test fabric. The residue creates a barrier that repels ink. Just wash in plain water, dry, and iron.
Also, let’s talk about ink selection. You need fabric ink or textile paint. Regular craft acrylic will crack and wash out. My personal preference is a permanent fabric ink pad for smaller stamps, or a textile screen-printing ink that you roll onto the block with a brayer for larger coverage. If the ink bleeds into the linen fibers and spreads beyond the edges of your lemon slice, the ink is too wet or the fabric is too loose a weave.
Mistake #5: Rushing the Drying and Finishing Process
Ok so you’ve stamped all of your citrus slices, the pattern looks incredible, and you feel like a printmaking pro. Then you fold the linen in half to put it away and the ink transfers onto itself. Yeah. I did that too. It’s a gut-punch, I won’t lie.
Fabric ink takes way longer to set than you think it will. The surface might feel dry to the touch in an hour, but the ink underneath is still working its way into the linen fibers. Give your stamped fabric a full 24 hours to dry before you even move it. If you absolutely can’t wait, put a piece of parchment paper between the layers and roll it instead of folding.
Once the ink is fully dry, set it with heat. Iron the back of the fabric on a medium-high setting for about three minutes without steam. Some inks can be set with a tumble dry cycle, but I always trust the iron more. This step is critical if you actually plan to use your stamped lemon slices as napkins and wash them more than once. Let it set, let it cure, and then enjoy the fact that you created something genuinely handmade.
Look, blockprinting lemon slices on natural linen is one of those crafts that looks like it requires a studio full of specialized tools, but it really just needs patience and a willingness to redo a few stamps. The mistakes are forgivable. They’re part of how you learn the exact pressure and rhythm that your hands need to find. And once you get that first perfect print, the one where every tiny segment of the lemon slice shows up sharp and even, you’ll be hooked.
If you have been thinking about trying this print trend (yes, the boho lemon pattern is still going strong, and no, I am not tired of seeing it), I hope you use these tips to skip the frustrating part. The mistakes I made are yours to avoid. Grab a stamp, some buttery natural linen, and a pot of black fabric ink, then find your own rhythm. You might surprise yourself with how good it feels to press that first perfect citrus slice. If you make a batch of these, tag me or drop a comment and let me know how many times you had to resist folding the fabric before it was dry. I’d love to hear that I’m not the only one who learned that lesson the hard way.
Leave a Comment