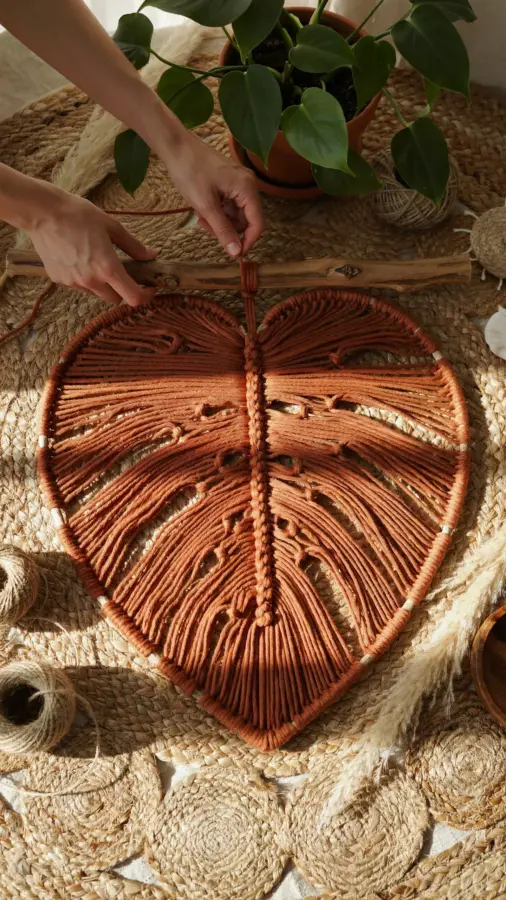
If you love adding natural texture to your walls, a handmade macrame leaf wall decor piece made from jute is a simple project that transforms any room. I have made several of these for my own home and for gifts, and the process is more satisfying than you might expect. This guide walks you through the entire process, from choosing fiber to finishing your leaf, so you can create your own organic, earthy accent.
Choosing the Best Jute Fiber for Your Macrame Leaf Design
The foundation of any macrame leaf is the fiber itself. Not all jute is created equal, and picking the right one makes your knots tighter and your finished piece more durable. I prefer a medium twist jute, around 3 to 4 millimeters thick, because it holds its shape well without feeling like rope.
Thicker jute looks chunky and rustic, which works for larger leaves. Thinner jute gives a more delicate, detailed look. For a first project, stick with natural undyed jute. The warm brown and golden tones blend beautifully with most wall colors. You can always experiment with dyed jute later if you want a pop of color.
Avoid using jute that feels too stiff or has a lot of loose fibers. A softer, tightly spun cord will be easier on your hands as you tie each knot. Look for jute labeled for macrame or crafting, not the heavy twine used for gardening.
Essential Tools and Materials for Handmade Leaf Wall Art
Before you start knotting, gather everything you will need. This keeps the process smooth and prevents mid-project frustration. Here is what I typically have on my worktable:
- Jute cord – about 50 yards for a medium leaf (15 to 18 inches long). Buy extra if you want a larger piece.
- Scissors – sharp fabric scissors for a clean cut, not kitchen shears.
- Measuring tape or ruler – to cut even lengths for your leaf ribs.
- A wooden dowel or branch – this will be the top hanger. A stick from your yard looks especially organic.
- Small comb or wire brush – to fray the ends of the jute for a softer edge.
- Fabric glue or hot glue gun – optional, but helpful if you want to secure the final knots.
I also keep a clipboard handy. Clipping the top of your work to a board keeps tension even while you knot. This little trick made my leaves much more symmetrical.
Step by Step Guide to Knotting a Macrame Leaf
This is the core of the project, and it is simpler than you might guess. I will break it down into clear actions so you can follow along without getting lost.
First, cut about 20 pieces of jute cord, each roughly 24 inches long. Fold each piece in half and loop it onto your dowel using a lark’s head knot. Repeat until you have 10 loops, which gives you 20 working ends. This will be the skeleton of your leaf.
Now you need to create the central rib. Take the two center cords and tie them together in a square knot. Then use the next cord on each side and tie it into the center. Continue this pattern outward. Each row should use one more cord from each side, forming a V shape. This is the classic leaf structure.
After you have built the main diamond shape, you will want to add depth. Take a separate piece of jute about 18 inches long and weave it horizontally through the vertical ribs. This creates the vein lines on your leaf. Alternate over and under for a realistic look.
When you reach the bottom, gather all loose ends and tie them together tightly with a simple overhand knot. Trim the ends evenly and use your comb to fray them into a soft, feathery edge. The fraying gives the leaf that natural, windswept boho vibe.
Adding Vintage Inspired Details to Your Leaf Design
A plain leaf is nice, but adding small vintage touches makes it feel like a cherished heirloom. I have been using antique wooden beads and old brass rings to give my leaves a worn, collected look.
Thread a wooden bead onto the center cord before you start knotting, so it sits at the top of the leaf as a focal point. You can also tie tiny half-hitch knots along the central rib for a braided texture. This mimics the handwork found in traditional macrame from the 1970s.
Another trick is to use a piece of driftwood instead of a dowel. The irregular shape and natural grain make each leaf completely unique. Drill small holes in the wood to thread your jute through, or just wrap the cord around the wood and knot it in place.
Do not be afraid to mix materials. A few strands of cotton cord combined with the jute creates a subtle contrast. The cotton stays softer while the jute provides structure. This combination looks especially nice in monochrome rooms.
Styling Your Macrame Leaf in Boho and Farmhouse Spaces
Once your leaf is finished, you need to place it where it shines. I have moved mine around several rooms, and it always finds a perfect spot.
#macrameleaf #macrame #walldecor #diyhomedecor #handmade
Leave a Comment